Linklemo Camera Setup Manual
Using Guiding
1) Turn on the frame
Charge on the frame, press the button to turn on.
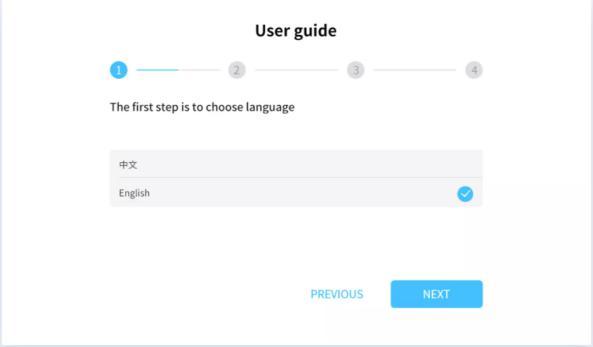
2) Select the language
After turning the camera, Users selects the language of the photo frame according to the prompt of the photo frame.
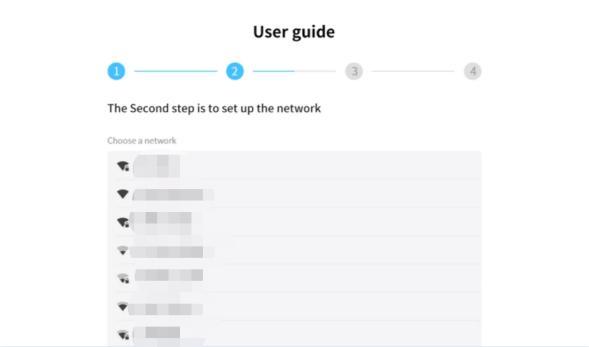
3) Configurate the network
After selecting the language user need to configurate the photo frame network, and downloads the “Linklemo” APP . Then click Next to go to Users guide step 4.
4) Download “Linklemo”
Users can search “Linklemo” in iTunes App Store or Google Play to download and install APP.

5) Log in register
Users open the “Linklemo”APP to login register through mobile phone number, at the same time, users can also use Wechat and Alipay for the third-party login.

6) Add the frame
After login, users enter the homepage, click ![]() to enter the adding device page, click
to enter the adding device page, click ![]() or click
or click ![]() to add a photo frame.
to add a photo frame.

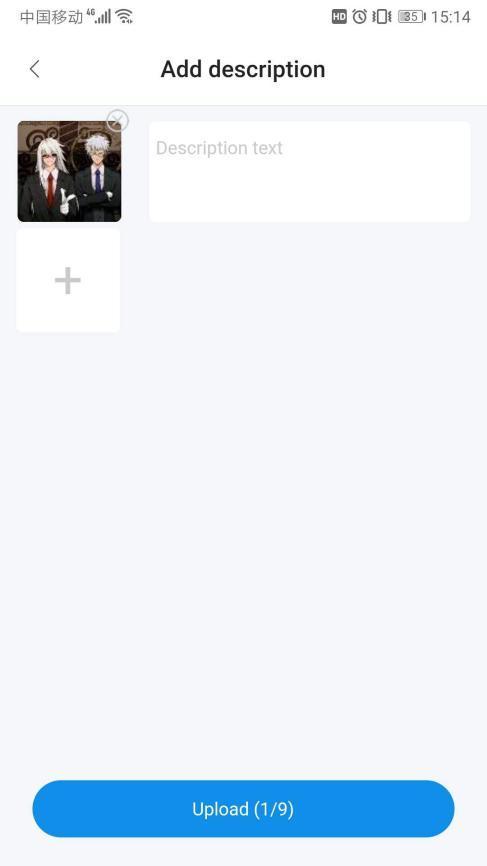
7) Upload the photo
After Users adds the device, click the photo frame to enter the photos frame and start using it. Click to enter to add photos or videos. No more than 9 videos or photos can be uploaded at a time, and length of the video cannot exceed 15 seconds. After select a photo or video, Users can add a description to it.
8) Photo manipulation
- All, hidden, and display filtering: users can filter the hidden and displayed status of the photo frame
- Photo and video filtering: users can view the number of photos and videos in the frame, and can only watch photos or videos
- Preview: Users clicks on a photo or video to enter the preview state. The preview only obtains the thumbnail of the photo or video, and the video in the preview state cannot be played.
- Edit: In the preview state, Users can click
 to edit the description of the photo or video.
 - Details: In the preview state, Users can click
 to view the location, creation time and file size of the photo or video.
 - Hide/Show: In the preview state, Users can click to hide or show the photo or video. The button action is determined according to the current hidden or displayed state of the photo or video.
- Delete: In the preview state, Users can click to delete the photo or video directly from the frame.
- Batch operation: users long press photos or videos to enter batch operation mode, and users can select multiple photos to hide, show or delete in batches.

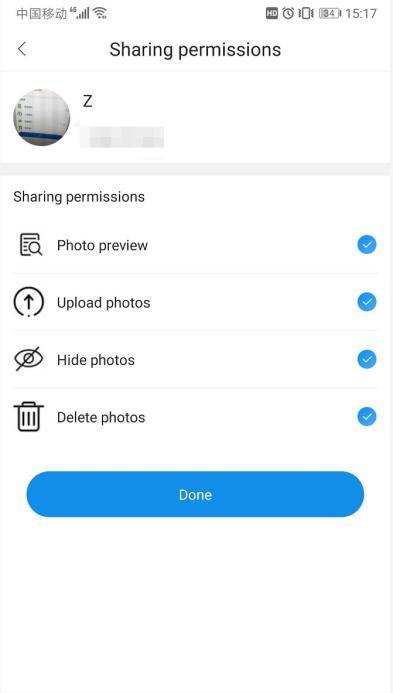
9) Share the frame
Users can click “My”-“Share Management” to add their own photo frames to others for use by adding or scanning codes. When choosing to share, set permissions to limit the functions that can be used by the shared person.


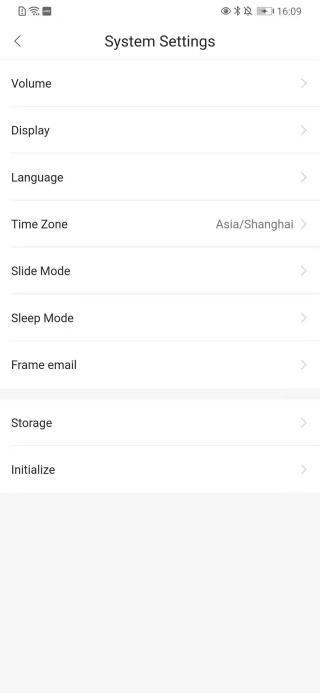
10) Photo frame email
Users can click “Settings”-”System Settings”-”Frame email” to set the email to which the frame belongs. And than users can upload photos to the frame by sending them to the email.
The Frame Parameter
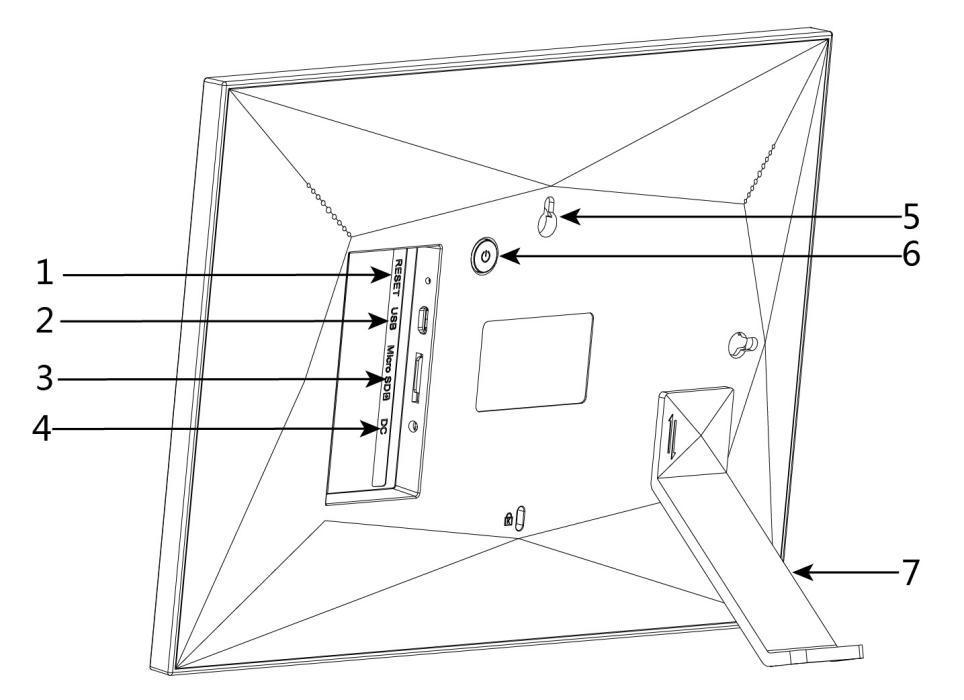
| Number | Functions |
|---|---|
| 1 | Restart Button |
| 2 | USB Interface |
| 3 | SDcard Socket |
| 4 | Power Connector |
| 5 | Hang wall Hole |
| 6 | ON/OFF Button |
| 7 | Support Rod |
Frame Menu
After users opens the photo frame, click on the screen, the photo frame will display a menu
- Gallery: Users enter the gallery to manage photos and videos in the photo frame in batches
- Setting: Users enters the frame setting page to set the frame
- Shutdown: Users shuts down, restarts, and sleeps the photo frame
- Hide: Users can directly hide the currently previewed photo or video
- Delete: Users can directly delete the currently previewed photo or video
- Fill frame: Users fills or adapts the currently previewed photo or video to the frame
- Calendar: Users can access the calendar to view the date
- Clock: Users can access the clock to check the time


1) Gallery
Hide, show Users can click ![]() the button of a photo or video to show or hide the current photo or video, and click
the button of a photo or video to show or hide the current photo or video, and click ![]() the button to exit the gallery.
the button to exit the gallery.

Batch operation
Users clicks “Select” in the upper right corner of the gallery to enter the batch operation mode, and Users can perform batch operations on photos or videos. Click “Cancel” in the upper right corner again to exit the batch operation mode. Click the button to exit the gallery.
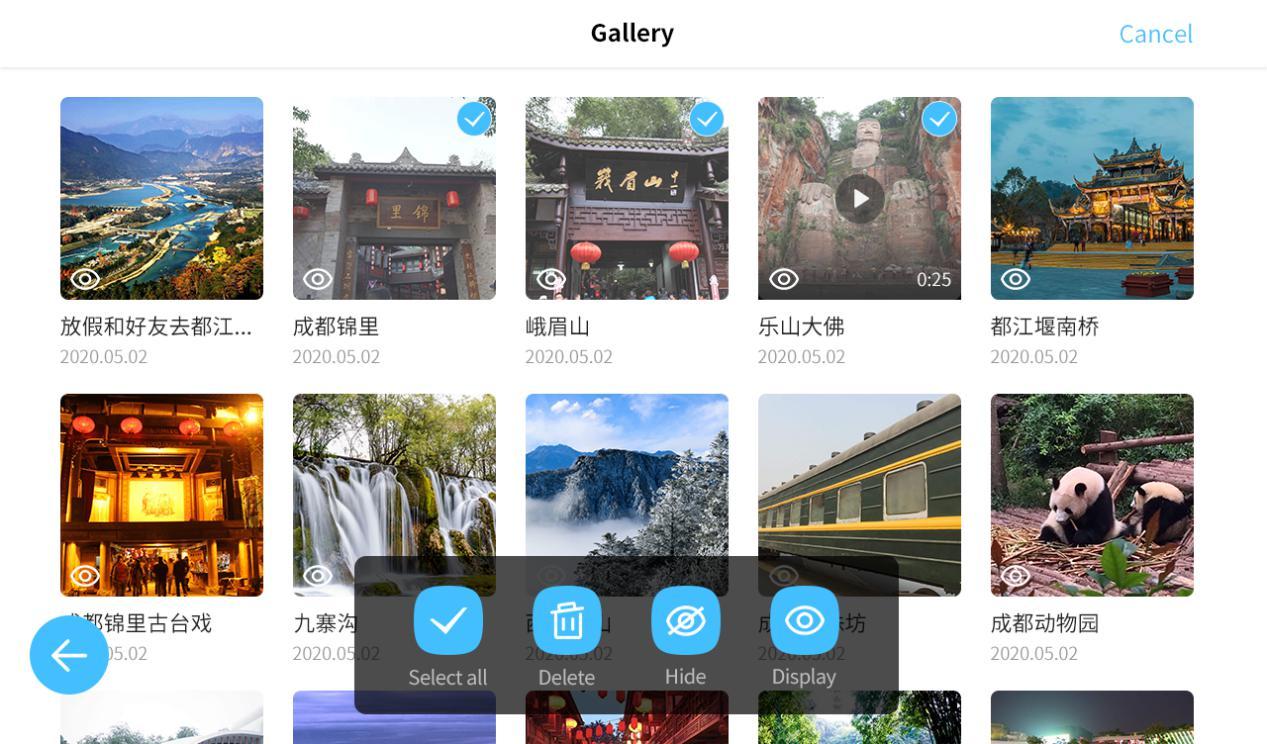
View
Users can click on a photo or video in the gallery to view the photo or video directly
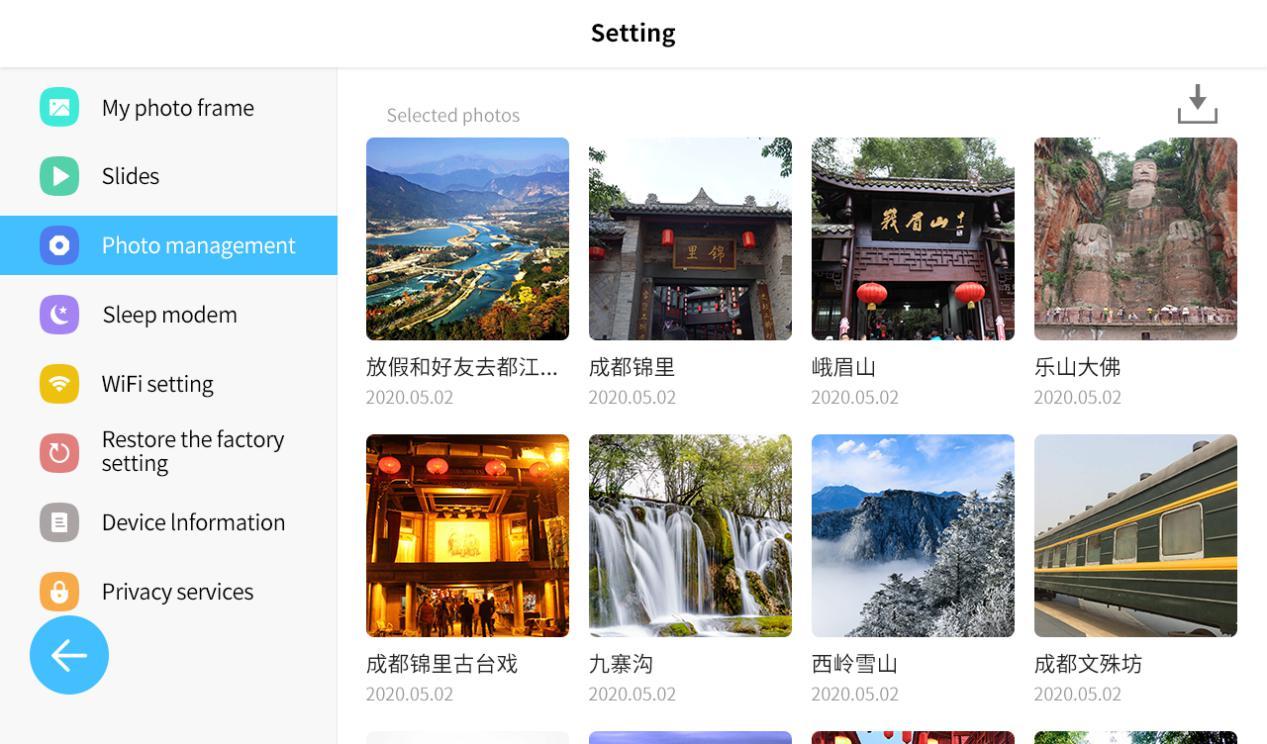
2) Settings
① My frame
- Frame name: users can set the frame name according to their own preferences
- Frame language: Users can set the language supported by the frame. Currently supports Chinese and English
- Set time zone: users can set the current time zone of the photo frame
- Date format: Users can set the format of the frame date display, there are 24-hour format and 12-hour format
② Slide show
- Slide show: Users can set whether the photo frame will play a slide show
- Display settings: Users can set whether to display the description of the photo or video and whether the photo or video is filled into the frame
- Human body induction: Users can set the human body induction time. Human body sensing means that the photo frame automatically sleeps after a period of time without sensing the human body
- Brightness: users can set the current brightness of the photo frame
- Volume: Users can set the volume of the photo frame
- Switching interval: Users can set the switching interval between each slide when the photo frame is playing a slideshow
- Switch mode: Users can set the switch mode of the photo frame to play the slideshow, currently supports time sequence and random
- Switching effect: Users can set the switching effect of the photo frame to play the slideshow, currently supports smooth, windmill, zoom, and flip
③ Photo management
- Memory display: users can view the current internal storage space of the photo frame, as well as the number of photos and videos
- Import photos: Users need to insert an external TF card, and the photos or videos in the external TF card can be imported into the photo frame. Users clicks “Import Photos”, selects the photos to be imported into the photo frame, and clicks
 the button in the upper right corner to import.
 - Export photos: Users need to insert an external TF card, and the photos or videos in the photo frame can be exported to an external TF card. Users clicks “Export Photos”, selects the photos to be exported to the external TF card, and clicks the button in the upper right corner to export.
④ Sleeping mode
Users can set the device to sleep within a specified time period
⑤ WIFI settings
Users can set the photo frame network here. We will save the previously set network, click to connect directly
⑥ Factory reset
Users can click “Restore Factory Settings” to reset the device
⑦ Device information
Users can view the device QR code, device ID, device model and firmware version.
- The device QR code and device ID are used to scan the device QR code or input the device ID when Users adds the device through the “Linklemo” APP
- Firmware version: When the photo frame has a new firmware version, a small red dot will appear at the firmware version, and Users can click “firmware version” to upgrade the firmware
⑧ Private service
Users can view the privacy agreement and service statement of the photo frame
3) Shut down
Users click on ![]() to enter the shut down page. Click on
to enter the shut down page. Click on ![]() to shut down the frame. Click on
to shut down the frame. Click on ![]() to restart the frame devices. Click on
to restart the frame devices. Click on ![]() to immediately put the photo frame into sleep mode.
to immediately put the photo frame into sleep mode.
4) Hide
Users click on ![]() to hide the current photo and video
to hide the current photo and video ![]() .
.
5) Delete
Users click on ![]() to delete the current photo and video.
to delete the current photo and video.
6) Fill the frame
Users click on ![]() to fill the current photo or video into the frame. If the current photo or video is already in the state of filling the frame, the button state will change to fit to the frame, click it to make the current photo or video fit to the frame.
to fill the current photo or video into the frame. If the current photo or video is already in the state of filling the frame, the button state will change to fit to the frame, click it to make the current photo or video fit to the frame.
7) Calendar
Users click the “Calendar” button to enter the calendar page and view the calendar. Slide left and right to switch months and click the “Back” button to appear on the screen.
8) Clock
Users click the “Clock” button to enter the clock page. Click the “Back” button to appear.
FCC Warning
This device complies with Part 15 of the FCC Rules. Operation is subject to the following two conditions: (1) this device may not cause harmful interference, and (2) this device must accept any interference received, including interference that may cause undesired operation.
NOTE: This equipment has been tested and found to comply with the limits for a Class B digital device, pursuant to Part 15 of the FCC Rules. These limits are designed to provide reasonable protection against harmful interference in a residential installation. This equipment generates, uses and can radiate radio frequency energy and, if not installed and used in accordance with the instructions, may cause harmful interference to radio communications. However, there is no guarantee that interference will not occur in a particular installation.
If this equipment does cause harmful interference to radio or television reception, which can be determined by turning the equipment off and on, the user is encouraged to try to correct the interference by one or more of the following measures:
- Reorient or relocate the receiving antenna.
- Increase the separation between the equipment and receiver.
- Connect the equipment into an outlet on a circuit different from that to which the receiver is connected.
- Consult the dealer or an experienced radio/TV technician for help.
Warning: changes or modifications not expressly approved by the party responsible for compliance could void the user’s authority to operate the equipment.
Radiation Exposure Statement
This equipment complies with FCC radiation exposure limits set forth for an uncontrolled environment. This equipment should be installed and operated with minimum distance 20cm between the radiator and your body.